Doing things manually can take lots of time for development. So for the time purposes we tend to use some eternal libraries in our projects. But as much as they easy and helpful, are we always sure that the external packages are completely safe? Using WhiteSource Bolt tool we can easily detect vulnerabilities in our code. In this post I will show you how to make your project more secure by just adding two more additional tasks in your Azure DevOps pipeline.
Before we start with the usage of the WhiteSource Bolt extension we will have to install the extension inside our organization in Azure DevOps. You can navigate to Microsoft Visual Studio Marketplace and get the extension. Don’t forget to set it up after getting it from the Marketplace, by navigation to your project in Azure DevOps > Pipelines > WhiteSouce Bolt. For more details on the setup and usage you can use the official WhiteSource Bold Documentation.
Set up WhiteSource Bolt in Azure DevOps pipeline
Open an existing pipeline where you build your project or choose an empty job. Once that is done add the following tasks.
Npm install
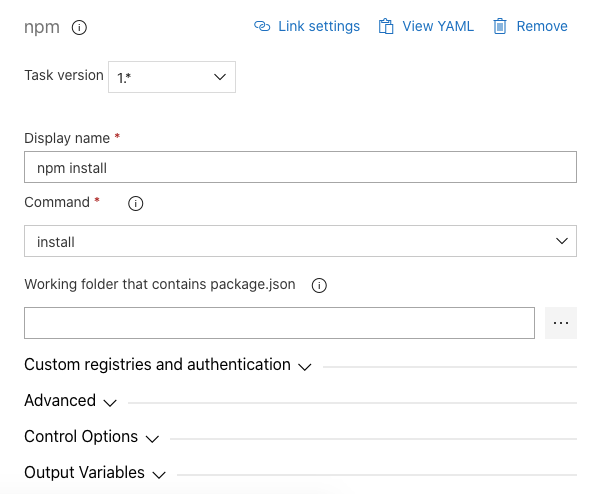
Click on the plus icon in the agent job to add task
Search for npm and select the npm task
In the Display name add representative name for your task
In the Command by default install will be selected
If you are using self hosted agent and npm is already installed on your machine you can skip the step above.
WhiteSource Bolt task
Click on the plus icon in the agent job to add task
Search for WhiteSource Bolt task
In the Display name add representative name for your task
For Root working directory by clicking on the three dots select the root of your project
Once this is set up Save & Queue. After the is job successfully finish at the top next to the Summary tab you can see the WhiteSource Build Report. By navigating there you can explore the vulnerabilities and the recommendations provided.
Testing is important part of the release management process. Having Unit tests is great advantage for your app from many aspects. From keeping code like documentation to easily detecting possible bugs after code changes.
Great thing is that Azure DevOps has a build in feature to track these statistics. In this Post I will show you how to create a pipeline in Azure DevOps that will run your Unit tests and checks it’s coverage.
Pre-requirements
One of the biggest advantages creating Xamarin.Forms app is that business logic can be separated from the View. That makes the app easy testable. That kind of code is usually found in your View Models, Services, Repositories.
Unit test project written in Visual Studio that is testing your business logic (e.g. ViewModels)
Navigate to your project in your organization on Azure DevOps and from pipeline choose New Pipeline, to create new pipeline. We are going to use the Classic Editor instead the YAML, so select Use the classic editor. Next thing is to select the source where our project is hosted and the default branch for manual and scheduled builds. Once that is done click on continue. From the templates search and choose Empty pipeline.
Once you find the Empty pipeline click on it and apply.
Build Unit tests
By having this section you will be provided with the Unit Tests statistics that will be shown as a separate tab at the top of your successful build (after pipeline run).
First set up a representative name for your pipeline. Once that is done select Pipeline.
Add name for the pipeline in Name field.
Set the machine that will build and execute your tests. You can choose Hosted > Azure Pipelines and you will be given a capable machine that can do that for you. Use Private > The name of your pool, to choose capable agent from your private pool of agents. It is really important that Coverage works with .NET Framework on Windows and .NET Core on all supported platforms, so whether it is Hosted or private choose a capable agent according to your project Target framework.
Select Get sources and in Clean choose True from the dropdown
Nuget tasks
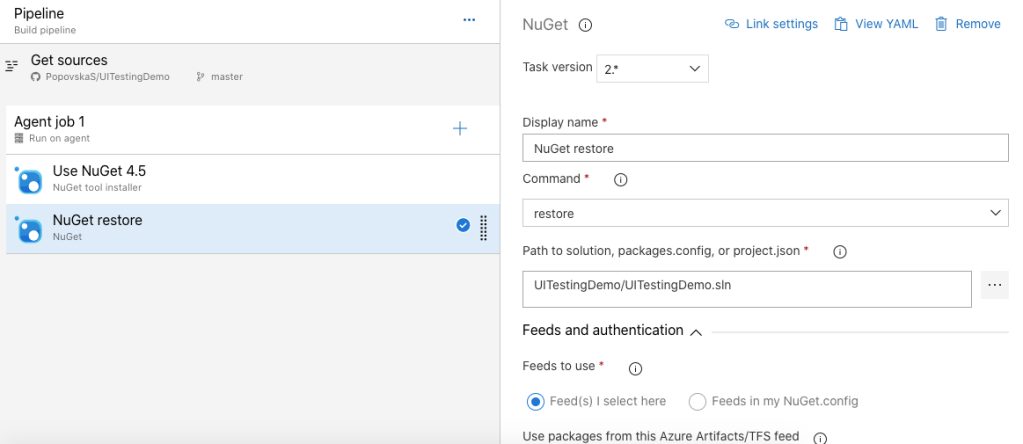
First thing to do is to add the Nuget tasks used to restore the Nuget packages for our project. Click on the plus icon near Agent job and select NuGet tool installer and then add NuGet to restore the nugets.
In the NuGet tool installer you can select the version of the installer.
In the NuGet task click on the three dots icon and select the .sln file to restore the nugets for your solution
Test execution
Search from tasks .NET Core you can use this task to build and tests your .Net Core projects.
In Display name add representative name for your Task e.g. Execute Tests from UI Test Project
In Command select test
For Path to project select the path to your project if you have multiple projects with unit tests add them all by separating them with space. Start with $(Build.SourcesDirectory) and locate the project/s e.g. $(Build.SourcesDirectory)/UITestingDemo/DemoUnitTests/DemoUnitTests.csproj
In Arguments we will choose the configuration in which we want the tests to be build. In this case Release: –configuration Release. Note that if you want to use this configuration throughout your whole pipeline define a variable with e.g. name BuildConfiguration and value Release and switch your arguments to –configuration $(BuildConfiguration).
Having this set up we can determine now form the pipeline the status for our Tests. In example, how many Passed, Failed etc… But further more to strengthen the stability of our project we can determine how much each of our files are covered with the tests.
Code Coverage
For the code coverage we are going to use Coverlet.
Pre-setup
Add coverlet.collector and coverlet.msbuild packages to your Unit tests project
The following explanation is taken from documentation. For how Coverlet Coverage works you can go through whole documentation and apply the things that meet your needs: https://github.com/coverlet-coverage/coverlet
Coverlet generates code coverage information by going through the following process:
Before Tests Run
Locates the unit test assembly and selects all the referenced assemblies that have PDBs.
Instruments the selected assemblies by inserting code to record sequence point hits to a temporary file.
After Tests Run
Restore the original non-instrumented assembly files.
Read the recorded hits information from the temporary file.
Generate the coverage result from the hits information and write it to a file.
Update Test execution task
Since now we are familiar that coverlet generates coverage file we can update our task with some more changes.
Update Arguments with –collect:”XPlat Code Coverage” – to get coverage
Since we want to test the code coverage only for specific files- where our business logic, is and ignore the extra files detected by coverlet we are also going to set this extra argument –settings ./UITestingDemo/test.runsettings, Create .runsettings file in your project. For the advanced options check the list of options that are supported by coverlet.
In example, in my test.runsettings I excluded the Xamarin.Forms.Core files and all other files in my projects except the ViewModels since my Unit tests cover only the View Models.
By adding these changes in the Temporary Directory few attachments will be added. From those files we are going to use **/coverage.cobertura.xml, this summary file is containing code coverage statistics.
Updated Test execution task
Publish code coverage
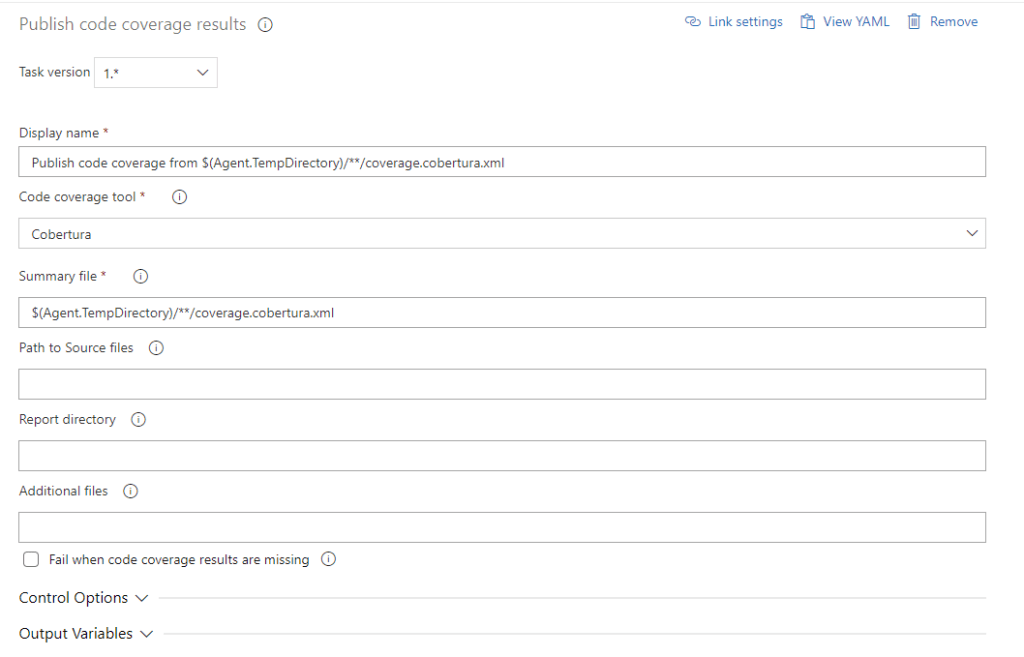
Lets publish our statists from Temporary directory to Azure DevOps. Search for Publish code coverage results task.
In Display name add representative name for your task
In Code coverage tool choose the tool from which code coverage results are generated.. In this case Cobertura
In Summary file detect the **/coverage.cobertura.xml from the temporary directory. If it is the only file in that folder with that signature you can use $(Agent.TempDirectory)/**/coverage.cobertura.xml
By setting all this we are ready to run our pipeline.
Testing is important part of the release management process. Having automated tests in your app is really great advantage for your app from many aspects. Having automated tests means your app can be tested on many devices and densities at once. Saves time, can be run on multiple platforms in the same time and does not require mandatory human presence at the time of testing. And these are just a small examples from the pool of benefits of having Automated UI Tests for apps.
The really great thing is that Azure DevOps together with the App Center are having this awesome opportunity. In this Post I will show you how to create a pipeline in Azure DevOps that will run your UITests in App Center.
Pre-requirements
Before creating the pipeline there are few things that have to be provided.
Application archive file. For Xamarin apps it can be an .ipa file(Xamarin.iOS) or .apk/.aab(Xamarin.Android). We are going to use these files to preform the tests on.
Xamarin.UITests (or any other Test platform you want to use that is supported on AppCenter) project where the app test are written. From this project we are going to create the test assemblies so we can preform the tests on the archive files.
App Center and Azure DevOps subscription. To run the tests on those services.
Setup
Navigate to your project in your organization on Azure DevOps and from pipeline choose New Pipeline, to create new pipeline. We are going to use the Classic Editor instead the YAML, so select Use the classic editor. Next thing is to select the set the source where our project is hosted and the default branch for manual and scheduled builds. Once that is done click on continue. From the templates search and choose Empty pipeline.
If you want to put the Creation of the archives files and Running the UITests phases in the same pipeline select Xamarin.iOS or Xamarin.Android templates. There you will find the tasks for App Center.
Once you find the Empty pipeline click on it and apply.
UI Tests Pipeline creation
First set up a representative name for your pipeline. Once that is done select Pipeline.
Add name for the pipeline in Name field.
Set the machine that will build and execute your tests. You can choose Hosted > Azure Pipelines and you will be given a capable machine that can do that for you. Of choose Private > The name of your pool, to choose capable agent from your private pool of agents. If you are going to use the pipeline for the iOS app choose Mac machine else for Android you can go with Windows or Mac Machine.
By clicking on Agent job in the Agent pool we can see that <inherit from pipeline> is selected by default. That means that for this phase we will use the set up from the pipeline done in the steps above.
Nuget tasks
First thing to do is to add the Nuget tasks used to restore the Nuget packages for our project. Click on the plus icon near Agent job and select NuGet tool installerand then add NuGet to restore the nugets.
In the NuGet tool installer you can select the version of the installer.
In the NuGet task click on the three dots icon and select the .sln file to restore the nugets for your solution
Download archive file
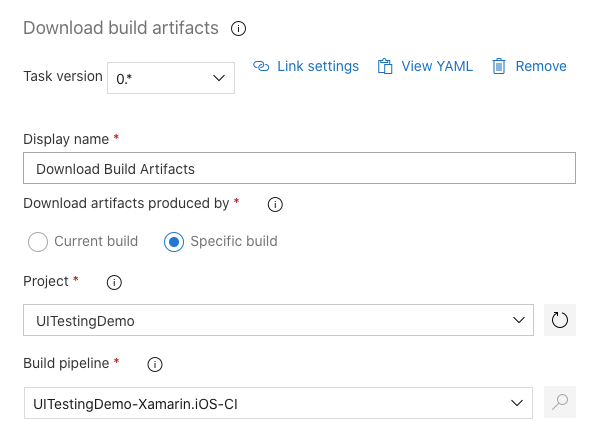
If we are having a pipeline that builds our app, where we can find .ipa file and/or .apk/.aab file we will have to select from the tasks Download build artifacts. If you are not sure how to create these pipelines you can check the following links:
Select Specific build radio button and two extra fields will appear
In the Project choose the project that contains the archive.
And in Pipeline choose the pipeline that contains the archive
In the Build version to download choose the Latest or a specific build you want to use for the testing
For Default type choose Specific type radio button and in the Matching pattern type **/NameOfYourArcive.extensionOfYourArchive or if that is the only file with .ipa or .aab/.apk extension you can use this matching pattern **/*.ipa or **/*.aab or **/*.apk
Destination directory is where your file will be downloaded so we are fine with the Artifact directory which is preselected by default
Build UITests and create built test assemblies
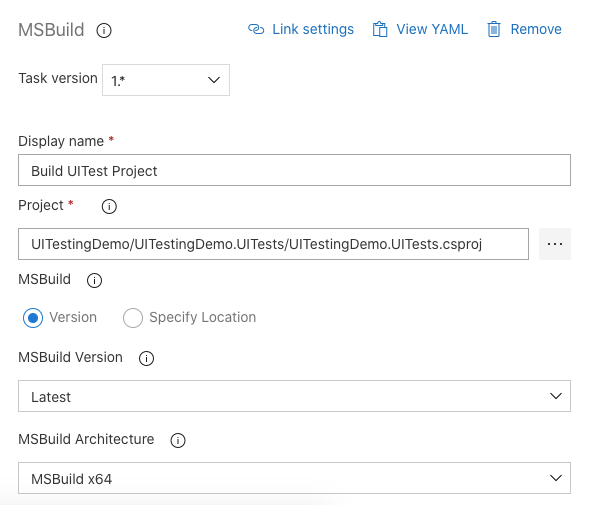
From the tasks add MSBuild task. This task will be used to build the Xamarin.UITest(or any other type of project supported on App Center) project and create the build test assemblies. Once that is selected do the following setup.
In the Project click on the three dots and select the Xamarin.UITests project: YourProject.csproj file
For MSBuild version and MSBuild architecture set up the configuration of the MSBuild.
For Configuration set the configuration in which you expect the UITests to be used, Debug, Release (Alpha, Beta, Prod – as custom created environments) . In the variables create variable with name BuildConfiguration and value e.g. Release. In Configuration field put $(BuildConfiguration)
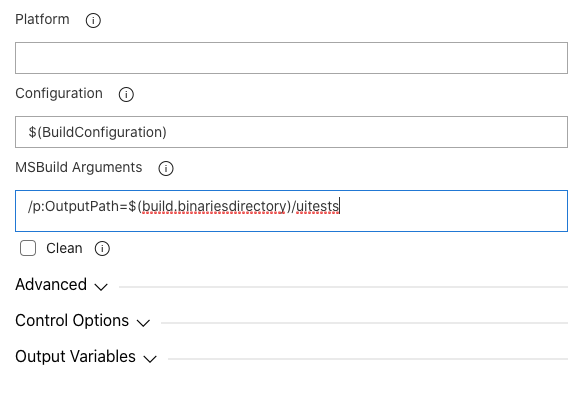
In the MSBuild Arguments set the path where you want your test assemblies to be placed. We will use this path in the next task. That can be done something like this /p:OutputPath=$(build.binariesdirectory)/uitests. Setting this way the they will be added in the binaries(b) > uitests folder
Create connection with App Center
Now since we have the archive file and the test assemblies we will need to provide them to the App Center to see out tests running there. For that from the tasks select App Center test and do the following setup.
In the Binary application file path set the path of your archive. Because in the steps above(section: Download archive file) we set the Artifacts directory the path will look something like this: $(System.ArtifactsDirectory)/drop/NameOfYourArcive.extensionOfYourArchive
In the Prepare tests section for Test Framework choose the framework your tests are written with e.g. Xamarin UI Tests.
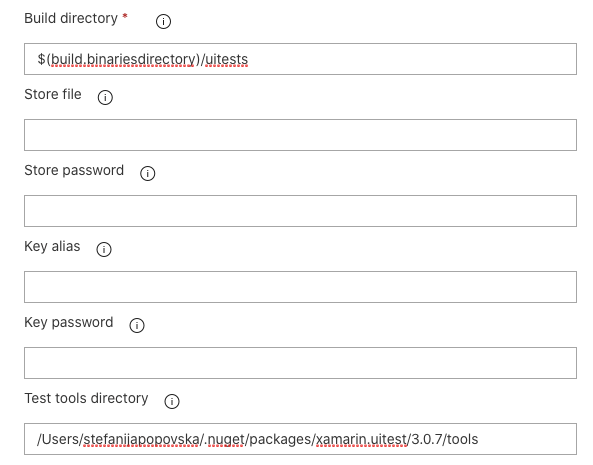
In the Build directory choose Path to directory with built test assemblies, in the previous step we explained where are we going to put the build assemblies and for this pipeline the path will look like this $(build.binariesdirectory)/uitests
If you have Store password, Key alias or Key password set them in the Variables lock them and use them safely in your pipeline. For this one we will left that empty.
In the Test tools directory locate the path of the test-cloud.exe file. This file is located in your Packages > Xamarin.UITests nuget file (if you are using Xamarin UI Tests) > version of the nuget package > tools the path will look something like this /.nuget/packages/xamarin.uitest/3.0.7/tools
Next is to set the Run Tests section
In the Authentication method set we can choose App Center service connection or Credentials. The main difference between these two is Service Connection can be used in multiple pipelines if permitted and Credentials are just for this specific pipeline.
If you choose Service connection. Click on Manage and click on New service connection. Search for Visual Studio App Center and then Next. In the Api Token put the token generated under your project in App Center(appcenter.ms) > Account Settings (click on account top right) > Scroll to Api Token > Add new token. Copy the generated Api Token and paste it in this field. In Service connection name add representative name for your connection. Click Save and get back to the pipeline. Click on the Refresh button and the connection will appear.
If you choose credentials in the App Center username add your App Center username and for App Center password the password for your App Center account. It is important to create these as locked variables so anyone with the access of the pipeline can not see our credentials.
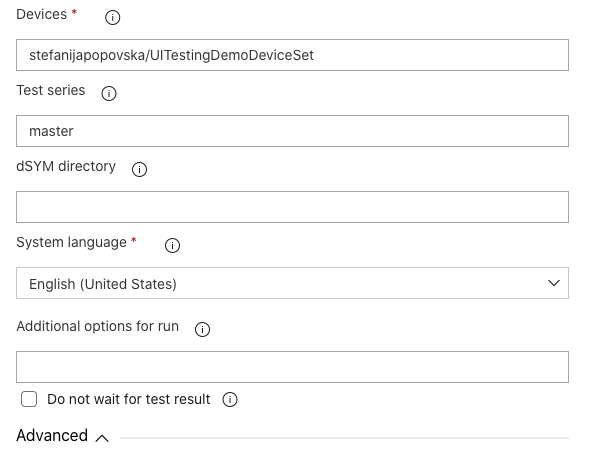
Set the App slug field. The App slug is combination of your username and the app identifier. Go to App Center(appcenter.ms) > Select your project. From the url copy {username}/apps/{yourProjectName} and remove /apps. The App slug should look something like this stefanijapopovska/UITestingDemo
In the Devices set the previously created Device set in the App Center(App Center > Test(from menu) > Device sets). This is something similar as the App slug. It should look something like this {username}/{nameOfYourDeviceSet} e.g. stefanijapopovska/UITestingDemoDeviceSet
In dSYM directory you can choose the path for iOS symbols
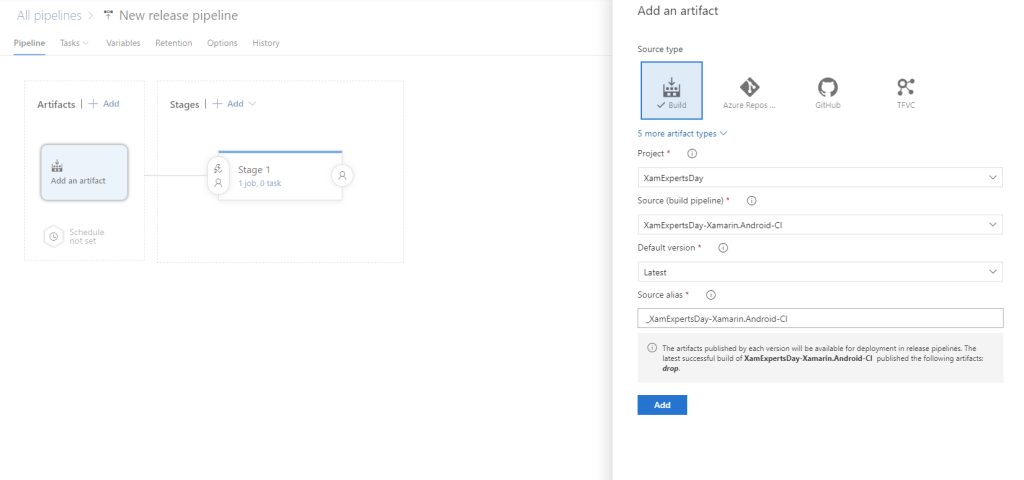
From the Pipelines in the menu choose Releases, on the plus button click New and New release pipeline
Select start with an empty job and add name to the stage e.g. Deploy app to Test Flight and close the dialog the updated name will be auto saved
On the + Add an artifact from the build source choose the definition that builds your app and contains the ipa file in the artifacts
All other fields will be preselected, if you want to make more additional changes change the available options.
Click add
Create Task that builds your app
On stages select the stage that deploys your app and in the tasks click on the plus button
From the Tasks search for “Apple app Store release” and choose the task named like that
Note: In the Agent Job > Agent specification you should choose Mac OS or choose your Mac as self hosted agent
Lets get back to the task
– Authentication method
There are two options to authenticate with App Store. The Service connection and Username and Password. The main difference between these two is that Service connection can be used between other pipelines (if access granted).
User Name and Password
In the email field enter your email and in the password enter the password from your Apple Store account, if you are using two steps verification check the field and type those credentials as well.
Service connection
Click on manage and you will be navigated to Service connections in Settings
Click on new service connection and choose Apple App Store than Next
In App Store email add your email address form App Store
In Password your personal password from App Store
In the Service connection name add meaningful name for your connection
Since other fields are optional you can just click save and the connection will be created for you
Navigate back to the release task and click on the refresh button next to the Service connection field and the connection will appear.
– Bundle ID
In the Bundle ID enter your unique identifier. That can be find in the info.plist from your Xamarin.iOS project the string form CFBundleIdentifier key.
– Binary Path
In the Binary Path choose the .ipa file from the drop, that file is the one from the artifacts that was created from the previous successful build definition.
In this post will be shown how to create Xamarin.iOS Build definition that will build your Xamarin iOS app and also create an archive file. The .ipa file later on can be deployed to the Test Flight and App Store. On how to deploy the app to the store can be seen in the following link: Release Xamarin iOS app with Azure DevOps
Before any app can be successfully distributed to the App Store there are some steps that needs to be done so the app will be recognized and verified from the Apple. That means that that every app has to have a Certificate and a Provisioning Profile valid files. For how to create those, check the following link: Create distribution certificates and provisioning profiles for your iOS app.
Create build definition
Navigate to your Azure DevOps account.
Form the Pipelines choose Pipelines and New pipeline
Click on Use the classic editor to create a pipeline without YAML.
Select your source. Than find the project you want to build
Select the default branch and click continue
From templates search for Xamarin.iOS and select the “Xamarin.iOS” task than apply
The definition will be created for you
Lets do some modifications
In the Pipeline > Agent Pool select the machine that will build your app “Hosted” if you want to use agent assigned to you or “Private” if you want to use your device as agent.
Enable “Install an Apple certificate” and “Install an Apple provisioning profile” tasks
Also remove “Select Xamarin SDK version“, “Copy Files to: $(build.artifactstagingdirectory)”, “Test with Visual Studio App Center”, “Deploy **/*.ipa to Visual Studio App Center” because we won’t need them for now.
Add the Provisioning profile and the .p12 files in Library
Choose from Pipeline > Library Library is used for keeping secure files
Choose Secure files and click on the +Secure files
Click on browse and add these two files separately
Build Pipeline
Install Apple certificate
Choose the .p12 file from the secure files in Certificate (P12) field
Navigate in the Variables from the menu and in P12password field as value add your p12 password also lock it so it wont be visible.
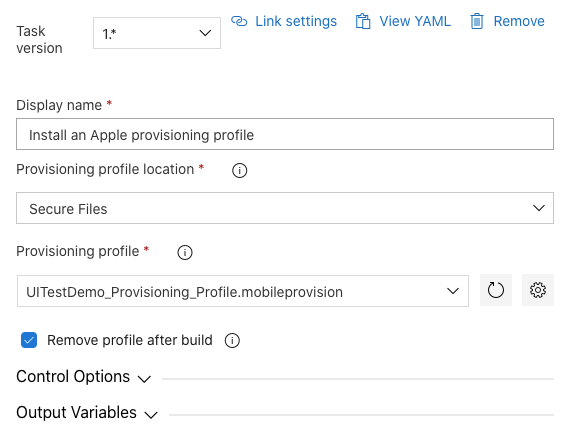
Install Apple provisioning profile
Choose the Provisioning profile from secure files in the Provisioning profile field
Xamarin.iOS
Unselect the “Build for iOS Simulator” checkbox
In the Signing & Provisioning in Signing identity enter $(APPLE_CERTIFICATE_SIGNING_IDENTITY). This variable is automatically set by the Install Apple Certificate task for the certificate you selected
In the Signing & Provisioning in Provisioning profile UUID enter $(APPLE_PROV_PROFILE_UUID). This variable is automatically set by the Install Apple Provisioning Profile task for the provisioning profile you selected.
Open the Advanced drop down list and in Arguments enter /p:IpaPackageDir=”$(Build.ArtifactStagingDirectory)”. With this set up the created .ipa file will be stored in the artifacts directory.
To understand what Json Auth File is for we need to know what Google Service Accounts stands for. As it stands in the documentation “A service account is a special kind of account used by an application or a virtual machine (VM) instance, not a person. Applications use service accounts to make authorized API calls.” “Each service account is associated with two sets of public/private RSA key pairs that are used to authenticate to Google: Google – managed keys and user-managed keys.” And that is what Json Auth File stands for.
We will use this file to Authenticate our Azure DevOps account with the Google console. That way we will be able to manage our deploys right from there.
How to use the Json Auth File.
Lets navigate to our project on Azure DevOps.
First, we need to securely store our Json Auth file. To make that possible, save the file under Pipelines->Library by adding new secure file on +Secure file button
The next thing to do is to edit the existing release pipeline for our app. Go into the tasks of the stage that deploys the app. Before “Google Play – Release Bundle” task add one more:
Download Secure File
Download Secure File
Add in the tasks “Download Secure File” task by Matt Labrum. Optionally you can use the other task by Microsoft Corporation.
In Display name add a representative name for your task e.g. “Download Secure Json File”.
In Secure file choose the json file that we previously added in the Library.
In the Target path folder we set the folder to download where the file needs to be downloaded. Because this is a secure file we need to be sure that when the job completes whether it succeeds, fails, or is canceled, the secure file is deleted from its download location. That’s why we have to set the target folder as $(mySecureFile.secureFilePath) or $(Agent.TempDirectory)
In Target file name choose a name that will represent the json file e.g. “ourappjsonfile.json”
Once we have that all set up our task will look something like this:
After the set up the job should look something like this:
Add changes to the Google play task
Navigate to the Google Play – Release Bundle task.
In the Authentication method choose Json Auth File
Once that is chosen new field will appear JSON key path. Put the Target path folder/Target file name from the Download secure task. It should look something like this: $(Agent.TempDirectory)/ourappjsonfile.json
We use the service connections to connect an external service for the purpose to execute tasks in a job. To release a Xamarin.Android app (or any other Android app in general) more particularly an executable file .apk/.aab through Azure DevOps we have two authentication methods to connect to Google Play store. By Service connection or by using the Json Auth File. For both methods the first few steps are the same and in the end decide which method we prefer more. To achieve that we need first to set up the Service account. (If you want to learn more on service accounts read the link: Google Cloud – Service accounts
Create Service account on Google Play Console
Navigate to Google Play Console. Note that to make these changes we need to have owner role. Once logged in with the correct role follow these steps:
Select Settings from the menu.
From Developer account menu choose API access Sub Menu
At the bottom section Service Accounts choose Create Service Account. We will be provided with a few steps that need to be done in order to create a service account. Let’s see them in details:
Here we choose the project we want to create service account for
Press on +Create service account
Add service account name, we can see that the Service account ID is created for us, we can make some changes by editing the field independently
Service account description is optional so we can leave it empty for now
By clicking create we will proceed on the second steps
To have full access to all resources choose for role: Project -> Owner
By clicking Continue we will proceed to the last step
Here you can grant access for more users or groups. But since it is optional let’s leave it empty for now.
By clicking Done new service account will be created.
Navigate to Service account details by clicking on created service account.
At the bottom under Key section choose Add Key
Choose JSON
The Json File will be automatically created and downloaded locally on our PC
Get back to Google Play Console, we can now see that under Service accounts new account was created for us. Just accept the premissions, and add some edits if needed.
Authorize Azure DevOps with Google Play using Service connection
If you you choose Service connection the new required field Service connection will appear.
Here we have two options, to create a connection for this particular project by clicking the +New button or to add global Service by clicking on Manage. If you have multiple projects on the same Google play console account I would prefer setting that is in the Service connection under Project Settings – by clicking Manage.
By choosing the second option, we will be directed to Project settings -> Service connections
Search for Google Play and choose it. Click Next. Open the downloaded .json file
In Service Account E-mail copy the client_email value from the .json file
In Private Key copy the private_key value from the .json file
In Service connection name add Connection Name you find representative for this connection
Description is optional so let’s leave it empty by now
Click save.
Navigate back to Release task and refresh the Service connection field. The connection will appear. Choose it and save.
Navigate to Releases sub-menu from the Pipelines menu and create a new release pipeline or edit the existing one. If you are going with a new release pipeline choose an empty job as a template. Once that is done New release pipeline will be added, ready for edits.
By clicking on Add an artifact choose as source type the build definition you used for building the solution and creating the artifact file. It should look something like this:
By pressing on the Add button the artifact will be linked and ready to proceed to the stage. Next, select the stage that is intended to deploy the app to Play store and navigate to Tasks.
If we search for Google Play tasks we can see there are several different tasks for deploying the app to the store. If we were about to choose the oldfashioned way for deploying the app to Play Store by providing a .apk file we would have chosen the Google Play – Release task. But because now we have the .aab file we need the Google Play – Release Bundle task.
By adding the task we can see there are several fields that are required for successful deployment:
Service connection – Google Play service connection that is configured with your account credentials.
Application id (com.google.MyApp) – The application id of the bundle you want to release, e.g. com.company.MyApp
Bundle path – path to the bundle (.aab) file you want to publish to the specified track. Wildcards can be used. For example, */.aab to match the first APK file, in any directory.
One by one
Lets take a look at them, one by one:
Service connection: Here is needed to authenticate with Play Store service so we can upload our .aab file. There are two methods for authentication: by using a Service connection or the Json Auth File. More on how to perform that see on this link: Authenticate Google Play with Azure DevOps. Once that is set correctly we are able to connect to the store and have a secure delivery for the app from this to that service.
Application id (com.google.MyApp) This refers to the package name. You can check that in your AndroidManifest.xml file
Bundle path Choose the .aab file you want to deploy from linked artifats.
And finally select the track you want to publish the bundle to. The Internal is selected by default.
There are other additional options in the pipeline that can be defined but with this is enough to deploy the app successfully to Play store.
Few days passed since the amazing event – Xamarin Experts Day and most of the questions I got were how to support the new presented upload format Android App Bundle – .aab using Azure DevOps and AppCenter since my topic was DevOps: Continuous delivery for Xamarin application, Azure DevOps and App Center, and in the demo I was using a Xamarin.Android build definition.
Note: The source code used for the build definition can be found on Github
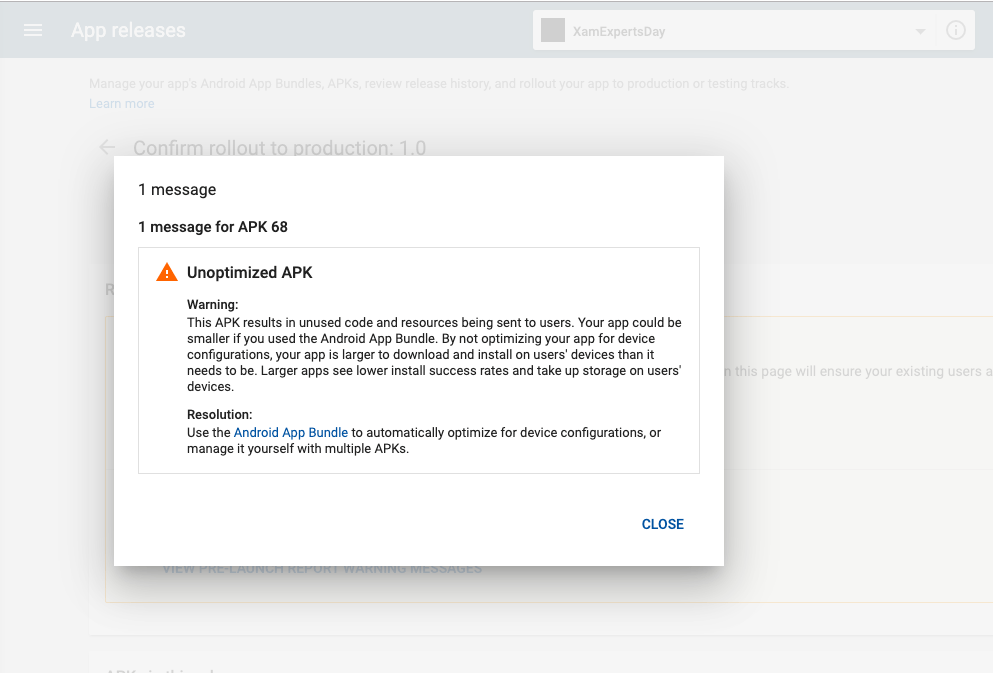
And YES, more than expected, because many of us has seen this warning when creating a release on Play Store.
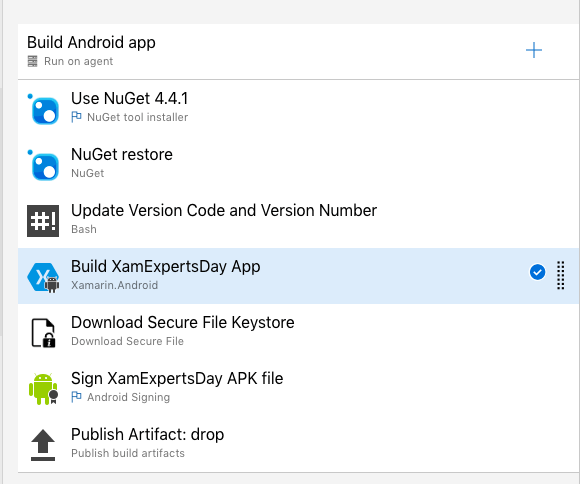
With all this set up navigate to Azure DevOps and edit the Android build definition. The definition that builds the app should look something like this:
For now just disable the current Xamarin.Android task that builds the Android app with Xamarin. It is important not to delete it because soon this feature will be available directly in this task. But let’s take a look at the alternative for now.
Search for MsBuild task, that builds with MSBuild. After adding it, in the Project field set your Android .csproj file and set the MsBuild options like they are on your Xamarin.Android task.
Next thing to do is to add additional arguments for the build. Set these arguments in the MSBuild Arguments field:
When AndroidPackageFormat is set as shown above, the SignAndroidPackage will create the .aab file in the bin directory, respectively in the chosen build configuration folder – the Release folder.
In the AndroidSigningKeyStore set the path where you store your .keystore file, if downloading from Secure Files – Library, check the target path folder inserted in the Download Secure File task.
After setting all these your YAML should look something like this:
Running this task will sign the app, so the Android Signing task will no longer be needed. Disable that task, or just simply remove it.
Few more additional steps
The MSBuild will create the .aab file in the bin folder within the Android Project folder. If the folder or file path you want to publish is Artifact staging directory or Binary directory and you want to continue using them in the artifact for publishing, add the Copy files task in between and move the .aab file there. For source folder set the path to .aab file and for target folder the publishing path.
After filling in this the YAML for Copy files task should look something like this: