Testing is important part of the release management process. Having automated tests in your app is really great advantage for your app from many aspects. Having automated tests means your app can be tested on many devices and densities at once. Saves time, can be run on multiple platforms in the same time and does not require mandatory human presence at the time of testing. And these are just a small examples from the pool of benefits of having Automated UI Tests for apps.
The really great thing is that Azure DevOps together with the App Center are having this awesome opportunity. In this Post I will show you how to create a pipeline in Azure DevOps that will run your UITests in App Center.
Pre-requirements
Before creating the pipeline there are few things that have to be provided.
- Application archive file. For Xamarin apps it can be an .ipa file(Xamarin.iOS) or .apk/.aab(Xamarin.Android). We are going to use these files to preform the tests on.
- Xamarin.UITests (or any other Test platform you want to use that is supported on AppCenter) project where the app test are written. From this project we are going to create the test assemblies so we can preform the tests on the archive files.
- App Center and Azure DevOps subscription. To run the tests on those services.
Setup
Navigate to your project in your organization on Azure DevOps and from pipeline choose New Pipeline, to create new pipeline. We are going to use the Classic Editor instead the YAML, so select Use the classic editor. Next thing is to select the set the source where our project is hosted and the default branch for manual and scheduled builds. Once that is done click on continue. From the templates search and choose Empty pipeline.
If you want to put the Creation of the archives files and Running the UITests phases in the same pipeline select Xamarin.iOS or Xamarin.Android templates. There you will find the tasks for App Center.
Once you find the Empty pipeline click on it and apply.
UI Tests Pipeline creation
First set up a representative name for your pipeline. Once that is done select Pipeline.
- Add name for the pipeline in Name field.
- Set the machine that will build and execute your tests. You can choose Hosted > Azure Pipelines and you will be given a capable machine that can do that for you. Of choose Private > The name of your pool, to choose capable agent from your private pool of agents. If you are going to use the pipeline for the iOS app choose Mac machine else for Android you can go with Windows or Mac Machine.
By clicking on Agent job in the Agent pool we can see that <inherit from pipeline> is selected by default. That means that for this phase we will use the set up from the pipeline done in the steps above.
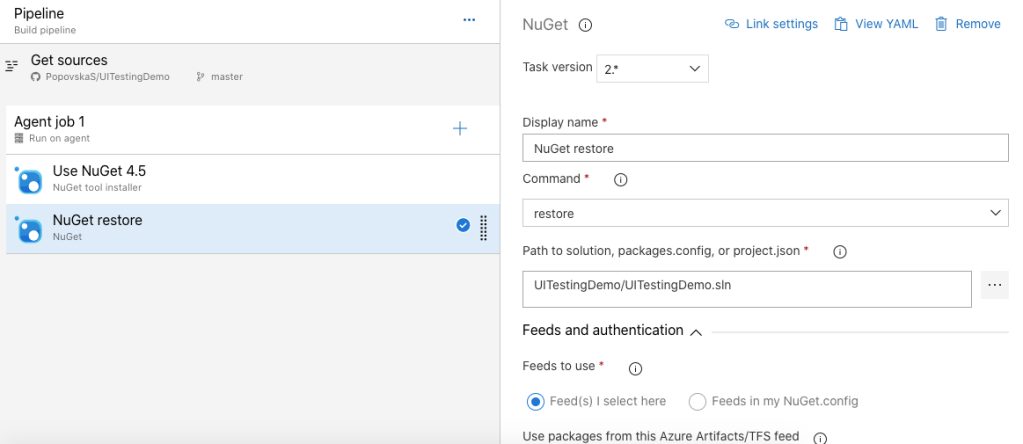
Nuget tasks
First thing to do is to add the Nuget tasks used to restore the Nuget packages for our project. Click on the plus icon near Agent job and select NuGet tool installer and then add NuGet to restore the nugets.
- In the NuGet tool installer you can select the version of the installer.
- In the NuGet task click on the three dots icon and select the .sln file to restore the nugets for your solution

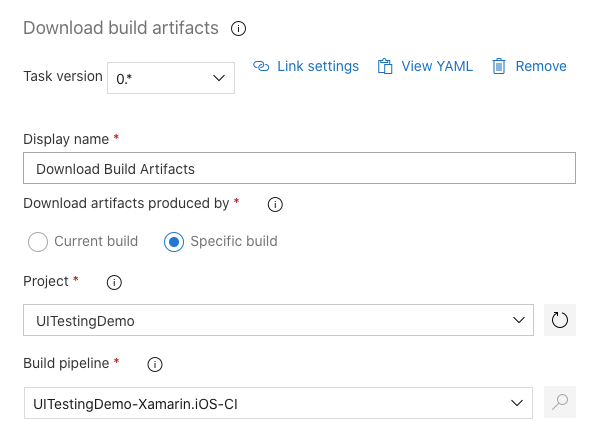
Download archive file
If we are having a pipeline that builds our app, where we can find .ipa file and/or .apk/.aab file we will have to select from the tasks Download build artifacts. If you are not sure how to create these pipelines you can check the following links:
For Xamarin.Android – .aab file – Android App Bundle for Xamarin.Android apps using Azure DevOps and App Center
For Xamarin.iOS – .ipa file – Build Xamarin iOS app with Azure DevOps
- Select Specific build radio button and two extra fields will appear
- In the Project choose the project that contains the archive.
- And in Pipeline choose the pipeline that contains the archive
- In the Build version to download choose the Latest or a specific build you want to use for the testing
- For Default type choose Specific type radio button and in the Matching pattern type **/NameOfYourArcive.extensionOfYourArchive or if that is the only file with .ipa or .aab/.apk extension you can use this matching pattern **/*.ipa or **/*.aab or **/*.apk
- Destination directory is where your file will be downloaded so we are fine with the Artifact directory which is preselected by default

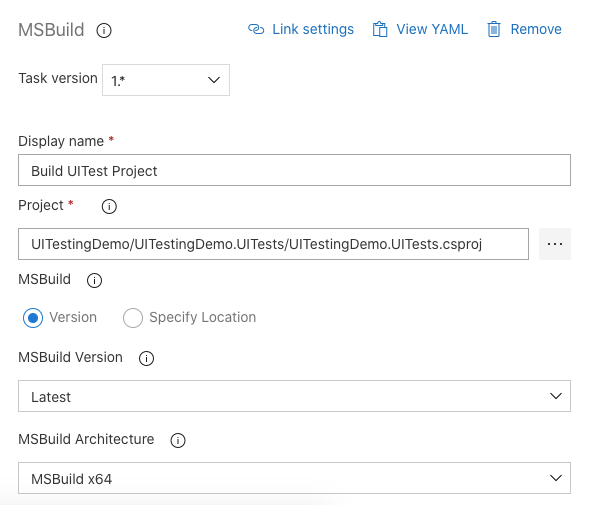
Build UITests and create built test assemblies
From the tasks add MSBuild task. This task will be used to build the Xamarin.UITest(or any other type of project supported on App Center) project and create the build test assemblies. Once that is selected do the following setup.
- In the Project click on the three dots and select the Xamarin.UITests project: YourProject.csproj file
- For MSBuild version and MSBuild architecture set up the configuration of the MSBuild.
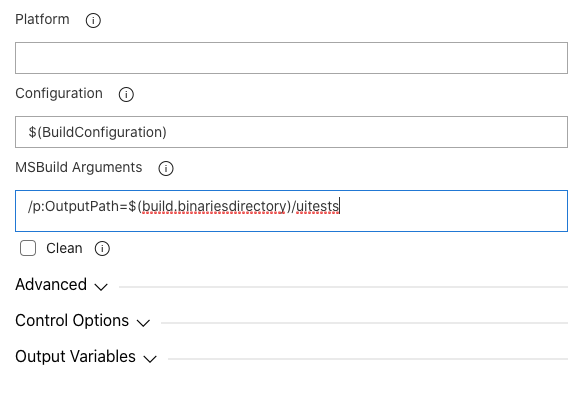
- For Configuration set the configuration in which you expect the UITests to be used, Debug, Release (Alpha, Beta, Prod – as custom created environments) . In the variables create variable with name BuildConfiguration and value e.g. Release. In Configuration field put $(BuildConfiguration)
- In the MSBuild Arguments set the path where you want your test assemblies to be placed. We will use this path in the next task. That can be done something like this /p:OutputPath=$(build.binariesdirectory)/uitests. Setting this way the they will be added in the binaries(b) > uitests folder
Create connection with App Center
Now since we have the archive file and the test assemblies we will need to provide them to the App Center to see out tests running there. For that from the tasks select App Center test and do the following setup.
- In the Binary application file path set the path of your archive. Because in the steps above(section: Download archive file) we set the Artifacts directory the path will look something like this: $(System.ArtifactsDirectory)/drop/NameOfYourArcive.extensionOfYourArchive
- In the Prepare tests section for Test Framework choose the framework your tests are written with e.g. Xamarin UI Tests.
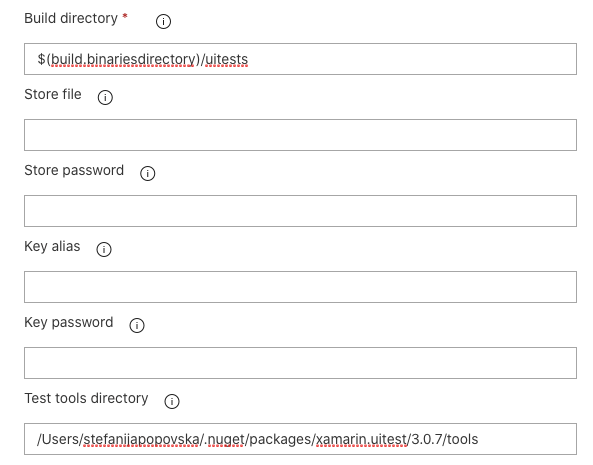
- In the Build directory choose Path to directory with built test assemblies, in the previous step we explained where are we going to put the build assemblies and for this pipeline the path will look like this $(build.binariesdirectory)/uitests
- If you have Store password, Key alias or Key password set them in the Variables lock them and use them safely in your pipeline. For this one we will left that empty.
- In the Test tools directory locate the path of the test-cloud.exe file. This file is located in your Packages > Xamarin.UITests nuget file (if you are using Xamarin UI Tests) > version of the nuget package > tools the path will look something like this /.nuget/packages/xamarin.uitest/3.0.7/tools
Next is to set the Run Tests section
- In the Authentication method set we can choose App Center service connection or Credentials. The main difference between these two is Service Connection can be used in multiple pipelines if permitted and Credentials are just for this specific pipeline.
- If you choose Service connection. Click on Manage and click on New service connection. Search for Visual Studio App Center and then Next. In the Api Token put the token generated under your project in App Center(appcenter.ms) > Account Settings (click on account top right) > Scroll to Api Token > Add new token. Copy the generated Api Token and paste it in this field. In Service connection name add representative name for your connection. Click Save and get back to the pipeline. Click on the Refresh button and the connection will appear.
- If you choose credentials in the App Center username add your App Center username and for App Center password the password for your App Center account. It is important to create these as locked variables so anyone with the access of the pipeline can not see our credentials.
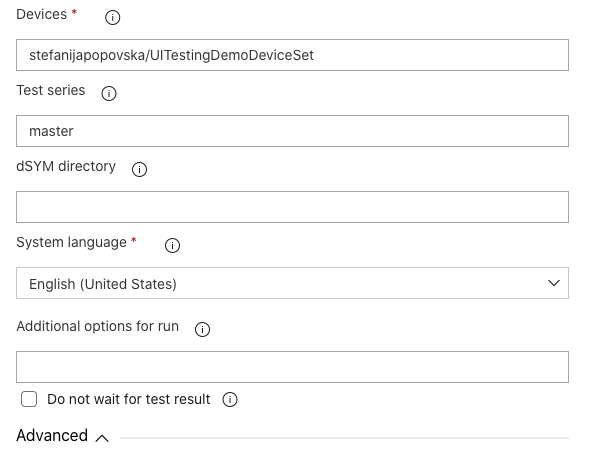
- Set the App slug field. The App slug is combination of your username and the app identifier. Go to App Center(appcenter.ms) > Select your project. From the url copy {username}/apps/{yourProjectName} and remove /apps. The App slug should look something like this stefanijapopovska/UITestingDemo
- In the Devices set the previously created Device set in the App Center(App Center > Test(from menu) > Device sets). This is something similar as the App slug. It should look something like this {username}/{nameOfYourDeviceSet} e.g. stefanijapopovska/UITestingDemoDeviceSet
- In dSYM directory you can choose the path for iOS symbols


Save & Queue.