
In this post will be shown how to create Xamarin.iOS Build definition that will build your Xamarin iOS app and also create an archive file. The .ipa file later on can be deployed to the Test Flight and App Store. On how to deploy the app to the store can be seen in the following link: Release Xamarin iOS app with Azure DevOps
Before any app can be successfully distributed to the App Store there are some steps that needs to be done so the app will be recognized and verified from the Apple. That means that that every app has to have a Certificate and a Provisioning Profile valid files. For how to create those, check the following link: Create distribution certificates and provisioning profiles for your iOS app.
Create build definition
- Navigate to your Azure DevOps account.
- Form the Pipelines choose Pipelines and New pipeline
- Click on Use the classic editor to create a pipeline without YAML.
- Select your source. Than find the project you want to build
- Select the default branch and click continue
- From templates search for Xamarin.iOS and select the “Xamarin.iOS” task than apply
- The definition will be created for you
Lets do some modifications
- In the Pipeline > Agent Pool select the machine that will build your app “Hosted” if you want to use agent assigned to you or “Private” if you want to use your device as agent.
- Enable “Install an Apple certificate” and “Install an Apple provisioning profile” tasks
- Also remove “Select Xamarin SDK version“, “Copy Files to: $(build.artifactstagingdirectory)”, “Test with Visual Studio App Center”, “Deploy **/*.ipa to Visual Studio App Center” because we won’t need them for now.

Add the Provisioning profile and the .p12 files in Library
- Choose from Pipeline > Library Library is used for keeping secure files
- Choose Secure files and click on the +Secure files
- Click on browse and add these two files separately
Build Pipeline
Install Apple certificate
- Choose the .p12 file from the secure files in Certificate (P12) field
- Navigate in the Variables from the menu and in P12password field as value add your p12 password also lock it so it wont be visible.

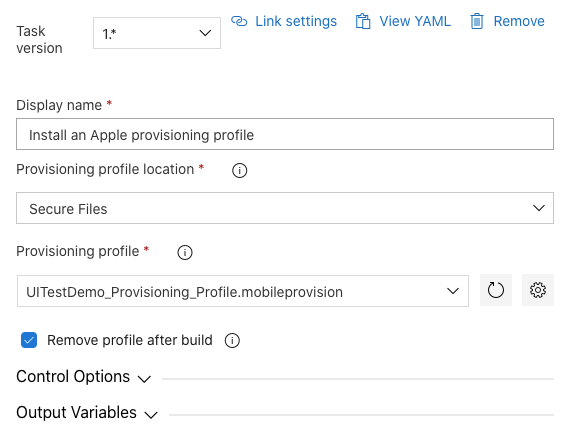
Install Apple provisioning profile
- Choose the Provisioning profile from secure files in the Provisioning profile field
Xamarin.iOS
- Unselect the “Build for iOS Simulator” checkbox
- In the Signing & Provisioning in Signing identity enter $(APPLE_CERTIFICATE_SIGNING_IDENTITY). This variable is automatically set by the Install Apple Certificate task for the certificate you selected
- In the Signing & Provisioning in Provisioning profile UUID enter $(APPLE_PROV_PROFILE_UUID). This variable is automatically set by the Install Apple Provisioning Profile task for the provisioning profile you selected.
- Open the Advanced drop down list and in Arguments enter /p:IpaPackageDir=”$(Build.ArtifactStagingDirectory)”. With this set up the created .ipa file will be stored in the artifacts directory.

All other fields and tasks can be left as default
Save & Queue.

Hi. Great post.
But when it comes to a real project – you typically have different environments. For e.g. DEV, UAT and PROD. Typically the backend for your mobile app is deployed to these env. SO when you want to test on your DEV env, you need your Mobile App build to be configured for DEV environment URLs or configuration.
Any idea how you will change the mobile app configuration depending on the environment in DevOps ?
LikeLike
1. In projects define configuration for diferent envirements
Condition=”‘$(Configuration)’==’DEV'” …
Condition=”‘$(Configuration)’==’UAT ‘” …
Condition=”‘$(Configuration)’==’PROD'” …
2. In the project define directives for different environments
#if DEV
//your dev Api, Keys etc
#elif UAT
//your uat Api, Keys etc
#elif PROD
//your prod Api, Keys etc
#endif
3. In Build definition for the *Configuration* set the wanted environment
Variable $(BuildConfiguration) value: DEV, UAT, PROD
LikeLike
You miss the point – you dont want to add you API keys to your source code and check it in to your repo. the CD is where these things needs to be controlled.
Typically in a web application scenario – we have configuration sections in the web app and during release – we write the environment specific values to those configuration settings.
but mobile is tricky. Hence the question i asked.
Thanks for the response.
LikeLike
As I understand you asked how can you manage different app environments, not how to store the secrets for them. You don’t have to put secrets in the code. By API I mean API URL, by “Keys” something that is specific for that environment.
LikeLike