Github & App center opportunities by making the release processes easier
The combination of these two powerful services has made the deployment for mobile application easier than ever, from building to testing and releasing in just few steps. I was amazed how repetitive process can be simplified and automated without any trouble for the developers. That is why I found it challenging and decided to create this article.
What are we going to do next?
For this article I choose to make modification on the application that was already on my repository for a while, you can look at this article for more details. The aim of the application is to represent just one place in Postcard format. Looking from that point of view there was no point to create so many repositories for the same application and a real time saver would be if the same application is able to be used for various places. I was thinking for a way to reuse the same code, but yet create many more different apps.
Why we need to brand an application?
At the first sight this may looks irrational but there are many use case scenarios where this is required, here are some of them:
- You want to sell same product for different companies, but all of them have different name, different logo and colors that are typical for the brand.
- You want to create multiple environments from the same application ALPHA, BETA, PRODUCTION they all are the same app but may work with another API.
Lets get started
Lets navigate to App Center, and choose Build section from the Menu. Choose to edit already existing build definition. In the built configuration there is a section called Build scripts. By using this section we can execute custom scripts in our application. As in the official documentation is stated three type of scripts are available: post-clone, pre-build and post-build. The post-clone script runs immediately after the repository was cloned but before we do anything else on our end. The pre-build script runs before the actual build starts. The post-build script runs after the build has finished and we have copied all the necessary artifacts to the output directory.
Where to create these scripts?
Create these scripts in the same folder where your .sln file is, or .cspoj file if Android. Note that there is already a collection of scripts that you may find useful.

The full code which I am modifying can be find on Github. It is an Xamarin.iOS application referring to the above script changes are in appcenter-pre-build.sh file.
Firstly lets take a look of the essential configuration information changes, that are under info.plist file.
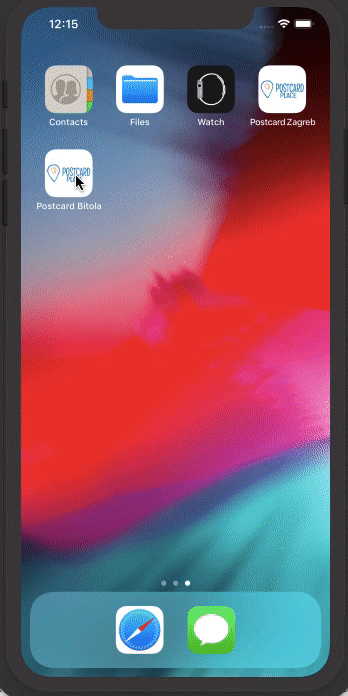
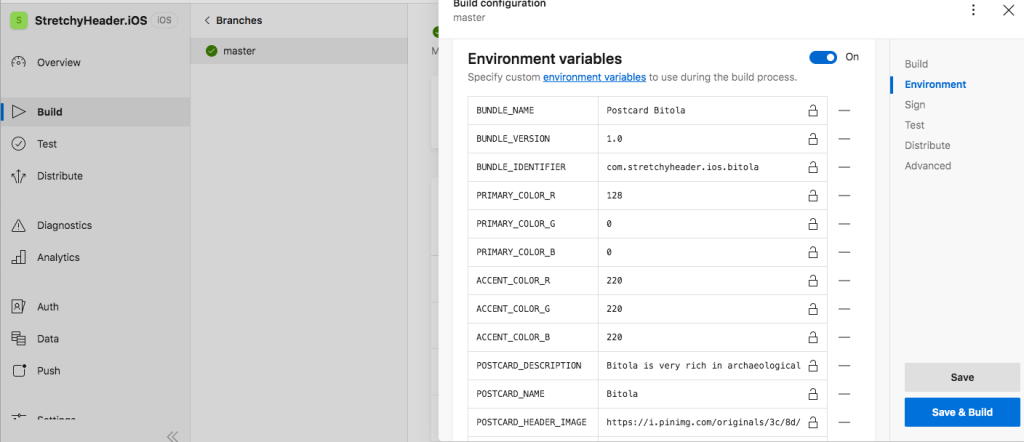
- Change App Name – Changing application name identifies what name users will see (from Postcard Zagreb -> Postcard Bitola)
plutil -replace CFBundleName -string "$BUNDLE_NAME" $APPCENTER_SOURCE_DIRECTORY/StretchyHeader.iOS/Info.plist
- Change the App bundle identifier – Changing the identifier means that we are creating unique application for any of the brands. (com.stretchyheader.ios.zagreb -> com.stretchyheader.ios.bitola)
plutil -replace CFBundleIdentifier -string $BUNDLE_IDENTIFIER $APPCENTER_SOURCE_DIRECTORY/StretchyHeader.iOS/Info.plist
- Change version name – Changing version name means that our branded app does not need to be the same version name(1.0, 2.0 …) as the original app
plutil -replace CFBundleShortVersionString -string $BUNDLE_VERSION $APPCENTER_SOURCE_DIRECTORY/StretchyHeader.iOS/Info.plist
Further more the changes should be applied as well as on the constants for the application. This usually includes Colors, Translations specific for application, Rules that tend to be modified during different scenario’s, variables that are used in the entire application.
Note: While developing application we have to be sure that we always use the same resource. e.g.: Using class for color palette, not hardcoding the colors.
In this case Branding folder files are what is going to be modified.
- Change color palette – Static content where Colors are placed
find $APPCENTER_SOURCE_DIRECTORY/StretchyHeader.iOS/Branding/ColorPalette.cs -type f -exec sed -i '' "s/PrimaryColor\ =\ \(.*\)/PrimaryColor\ =\ UIColor.FromRGB($PRIMARY_COLOR_R,$PRIMARY_COLOR_G,$PRIMARY_COLOR_B);/g" {} \;

find $APPCENTER_SOURCE_DIRECTORY/StretchyHeader.iOS/Branding/ColorPalette.cs -type f -exec sed -i '' "s/AccentColor\ =\ \(.*\)/AccentColor\ =\ UIColor.FromRGB($ACCENT_COLOR_R,$ACCENT_COLOR_G,$ACCENT_COLOR_B);/g" {} \;
- Change content – Dynamic data can be really complex to modify, for that purpose I chose a powerful command plutil as helper
plutil -convert xml1 $APPCENTER_SOURCE_DIRECTORY/StretchyHeader.iOS/Branding/AppResources.json -o $APPCENTER_SOURCE_DIRECTORY/StretchyHeader.iOS/Branding/AppResources.plist


plutil -replace headerImage -string $POSTCARD_HEADER_IMAGE $APPCENTER_SOURCE_DIRECTORY/StretchyHeader.iOS/Branding/AppResources.plist


plutil -replace title -string $POSTCARD_NAME $APPCENTER_SOURCE_DIRECTORY/StretchyHeader.iOS/Branding/AppResources.plist


plutil -replace description -string "$POSTCARD_DESCRIPTION" $APPCENTER_SOURCE_DIRECTORY/StretchyHeader.iOS/Branding/AppResources.plist


plutil -convert json -o $APPCENTER_SOURCE_DIRECTORY/StretchyHeader.iOS/Branding/AppResources.json  $APPCENTER_SOURCE_DIRECTORY/StretchyHeader.iOS/Branding/AppResources.plist


rm $APPCENTER_SOURCE_DIRECTORY/StretchyHeader.iOS/Branding/AppResources.plist
In many of the scripts you may noticed that the environment variables are marked with $. Same as in the code, we do not hard code the values because we want to use the scripts for many postcards. Here is where we define the variables.
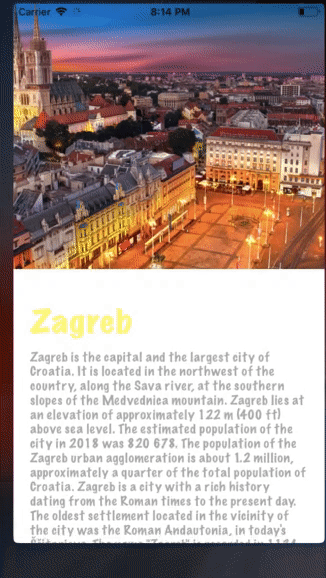
After applying all this changes and rebuilding the app from App Center, here is the product we get. A brand new postcard 🙂